Operator Instructions
WebDC3 web interface generator
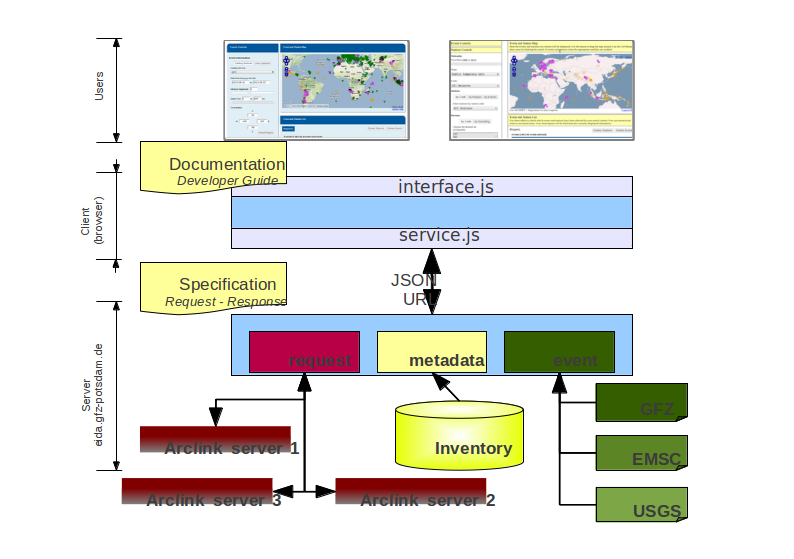
Here we outline what you may need to do to get the web interface up and running on your site. Things may be different for your site depending on your operating system, web server, network policies and so on.
The web interface mainly uses JavaScript for presentation, with Python used to provide underlying services.
Note
WebDC3 has a modular design. Here goes something about the modules:
- presentation
- events
- stations
- requests
- maps
- console
See the Developer Notes for more details about the modules.
Presentation
The design adopted for the implementation uses Ajax queries to load the individual page blocks. The final page assembles those blocks. You (a web site operator) have complete freedom to build your own page layout from the basic supplied blocks. The basic blocks are:
- Event Search Control block
- Station Search Control block
- Mapping Control block (plot events and stations)
- Request Control block
- Submitting block
- Status Control block
- Status Results block
- Console block
Further blocks can be implemented and later integrated into the current architecture design. Since each block is a self-contained unit we believe they will fit pretty well in any CMS or existing web pages at EIDA nodes, or even the EIDA portal at ODC.
Python and JavaScript (JS)
The complete interface needs a Python back end running, using the WSGI interface. In the Apache web server this is implemented in mod_wsgi. The back end uses the SeisComP seiscomp3 Python libraries for distance and travel time computation, configuration, and logging. The Python back end is responsible for:
- Fetch events information for the presentation layer (JavaScript) from different web services or databases.
- Fetch NSLC (network-station-location-channel, i.e. inventory) information to the presentation layer from an Arclink server.
- Place requests to one or many Arclink servers.
- Send e-mail to the user about her/his requests. FIXME: Do we still do that? Should we
- Fetch the status information from the Arclink server and send it to the presentation layer.
and a JavaScript set of modules that will contact the back end services and render the page on the user’s browser client and control the work flows on the page.
Also built in the back end there is an option to send configuration variables as key-value pairs from the server back end to the client JavaScript layer. These variables are initially defined in a configuration file on the server. They are fetched by the JavaScript layer and any module on the client has access to those variables that helps to guide the JavaScript in rendering the page. One clear example of such variables is the Web Mapping Service (WMS) address (URL) that is used by the Mapping control block. For the event control the default values for the magnitude filters and depth filters are also obtained from the server through this mechanism. (See configuration-options for details.)
Basic Page Set
Together with this package we are also supplying a set of static pages (HTML files) that can be used as a reference on how to use the package to build your customized interface. During the development of the modules we try not to force any possible work flow. See the content of the examples directory.
The basic page set is composed of two pages, one for making requests and one for checking status information. The request page use demonstrate how to use the modules numbered as 1, 2, 3, 4, 5 and 6 (block list above) and the status page uses blocks numbers 6 and 7.
Note
Make a table. Add screen shots. TODO
The customization of the pages should be done completely in HTML, using the ‘class’ and ‘id’ attributes of HTML entities. The basic idea is that each block renders itself inside a certain ‘<div>’ element, identified by a special ‘id’. Also some blocks can accept options that are passed through the ‘class’ attribute on the ‘<div>’. For example, the apparently empty element:
<div id='wi-StationSearchControl'></div>
would in the end be filled by the StationSearchControl block. And code like this:
<div id='wi-StationSearchControl' class='nosensor'></div>
would load the the StationSearchControl block, but the class nosensor would inhibit the sensor selection dialog to be present allowing each node to further customize its interface.
Note
Adding class=’nosensor’ doesn’t work, Aug 31 2013.
Also, since HTML allows multiple classes to the same container options related to formatting and option for the block control would coexist on the same ‘<div>’. Furthermore on the customization part of the operator manual [REF] you can find all the special ‘id’ and class options that are accepted by each control block to be associated to a certain ‘id’.
The Loader
To build the interface on your basic static HTML page all you need to do is to load the ‘loader.js’ script from the server into your page. When this file is executed in the client, it loads the other required JavaScript modules, guaranteeing the correct load order, as one module can depend on others.
If no ‘<div>’ with the ‘id’ of a particular module is not found on the page then that module will be disabled.
Requirements
- SeisComP(reg) 3 provides useful functions for configuration, geometry, travel time computation.
- Seiscomp Python library ($SEISCOMP_ROOT/lib/python/seiscomp), including a recent version of manager.py (SeisComP 3 release >= 2013.200; there is a temporary version with this release in the tools directory, which you can use to replace your installed version in $SEISCOMP_ROOT/lib/python/seiscomp/arclink).
- JavaScript libraries: jquery-base, jquery-ui [https://jquery.org/]
- OpenLayers. [http://www.openlayers.org/]
- Python, mod_wsgi (if using Apache). Also Python libraries for libxslt and libxml.
- Finally, users’ web browsers need to run JavaScript.
- Some testing/setup scripts use wget.
Download
The code can be downloaded in a tar file from the GEOFON web page at http://geofon.gfz-potsdam.de/software. Nightly builds can be downloaded from Github at [https://github.com/EIDA/webdc3].
If you downloaded the compressed file, untar it into a suitable directory visible to the web server, such as /var/www/webinterface:
cd /var/www/webinterface
tar xvzf /path/to/tarfile.tgz
- This location will depend on the location of the root (in the file system)
- for your web server.
If you want to clone it from Github, do it in a suitable directory as explained in the previous point.:
cd /var/www
git clone https://github.com/EIDA/webdc3 webinterface
Installation on Apache
To deploy the WebDC3 web interface on an Apache2 web server using mod_wsgi:
Unpack the files into the chosen directory. (See Download above.) In these instructions we assume this directory is /var/www/webinterface.
Enable mod_wsgi. For openSUSE, add ‘wsgi’ to the list of modules in the APACHE_MODULES variable in /etc/sysconfig/apache2:
APACHE_MODULES+=" python wsgi"and restart Apache. You should now see the following line in your configuration (in /etc/apache2/sysconfig.d/loadmodule.conf for openSUSE):
LoadModule wsgi_module /usr/lib64/apache2/mod_wsgi.soYou can also look at the output from
a2enmod -l- you should see wsgi listed.For Ubuntu/Mint, you can enable the module with the command:
sudo a2enmod wsgiand you can restart apache with:
sudo service apache2 stop
sudo service apache2 start
If the module was added succesfully you should see the following two links in
/etc/apache2/mods-enabled:wsgi.conf -> ../mods-available/wsgi.conf wsgi.load -> ../mods-available/wsgi.loadFor any distribution there may be a message like this in Apache’s error_log file, showing that mod_wsgi was loaded:
[Tue Jul 16 14:24:32 2013] [notice] Apache/2.2.17 (Linux/SUSE)
PHP/5.3.5 mod_python/3.3.1 Python/2.7 mod_wsgi/3.3 configured
 -- resuming normal operations
Add the following lines to a new file, conf.d/webinterface.conf, or in default-server.conf, or in the configuration for your virtual host:
WSGIScriptAlias /webinterface/wsgi /var/www/webinterface/wsgi/webdc3.wsgi
   <Directory /var/www/webinterface/wsgi/>
       Order allow,deny
       Allow from all
   </Directory>
You may be able to use the provided file webdc3.conf.sample: copy it to /etc/apache2/conf-available and symlink from /etc/apache2/conf-enabled.
Change /var/www/webinterface to suit your own web server’s needs. You may also need to add a section like:
<Directory /var/www/webinterface/>
    Order allow,deny
    Allow from all
</Directory>
Set environment for Apache: Apache needs the “SeisComP” environment variables set when it starts. The seiscomp3 bin and man directories aren’t needed. For OpenSUSE, add the following lines, which are provided by seiscomp print env, to /etc/sysconfig/apache2:
SEISCOMP_ROOT=/home/sysop/seiscomp3
LD_LIBRARY_PATH=/home/sysop/seiscomp3/lib
PYTHONPATH=/home/sysop/seiscomp3/lib/python
(Omit “export” and variable references, those will not work.)
For Debian and Ubuntu/Mint add the following lines to the /etc/apache2/envvars file:
# Make SeisComP3 available for webinterface:
export SEISCOMP_ROOT=/home/sysop/seiscomp3/
export LD_LIBRARY_PATH=/home/sysop/seiscomp3/lib:$LD_LIBRARY_PATH
export PYTHONPATH=/home/sysop/seiscomp3/lib/python:$PYTHONPATH
Change to the installation directory and fix the path which is added in wsgi/webdc3.wsgi:
sys.path.insert(0, '/var/www/webinterface/wsgi/')Copy webinterface.cfg.sample to e.g. $SEISCOMP_ROOT/etc/webinterface.cfg, or make a symbolic link from there to the webinterface directory:
cp wsgi/webinterface.cfg.sample wsgi/webinterface.cfg
cd $SEISCOMP_ROOT/etc
ln -s /var/www/webinterface/wsgi/webinterface.cfg webinterface.cfg
Edit webinterface.cfg and be sure to configure correctly the
SERVER_FOLDERandarclink.addressvariables. This is discussed under “Configuration Options” below.Copy one of the top-level example pages to index.html and customise the site as you wish.:
cd {top directory}
cp examples/generic/*.html .
Or:
cp examples/basic/index.html index.htmlOr:
cp examples/webdc2012/webdc.html index.htmlOr even (but don’t adopt GFZ’s corporate design [1] , unless you’re at GFZ):
cp examples/webdc3/*.html .
[1] For more guidance: (1) You may not use GFZ logos. (2) Please do not change the footer text “WebDC3 Interface © (2013–) Helmholtz-Zentrum Potsdam - Deutsches GeoForschungsZentrum GFZ” and the DOI or similar which appears in the index.html pages in the examples directory. (3) We would appreciate citation of WebDC3 by its doi:10.5880/GFZ.2.4/2016.001 when this is appropriate. Beyond that, you have great freedom. You may find the examples under “WebDC3 users” on the GEOFON software page, http://geofon.gfz-potsdam.de/software/webdc3/ helpful.
Start/restart the web server e.g. as root. In OpenSUSE:
# /etc/init.d/apache2 configtest
# /etc/init.d/apache2 restart
or in Ubuntu/Mint
# sudo service apache2 reload
# sudo service apache2 stop
# sudo service apache2 start
Check that the value of
arclink.addressis properly set in webinterface.cfg. For instance:arclink.address=eida.gfz-potsdam.de:18002Then, get initial metadata in the data directory by running the
update-metadata.pyscript in that directory. The meaning and use of the general parameters are the following:$ cd /var/www/webinterface/data $ ./update-metadata.py -h usage: update-metadata.py [-h] [-a ADDRESS] [-p PORT] [-o OUTPUT] [-v] {eida,singlenode} ... Script to update the metadata for the usage of WebDC3 positional arguments: {eida,singlenode} eida Get master table from EIDA singlenode Create master table based on local inventory. Type "update-metadata.py singlenode -h" to get detailed help. optional arguments: -h, --help show this help message and exit -a ADDRESS, --address ADDRESS Address of the Arclink Server. -p PORT, --port PORT Port of the Arclink Server. -o OUTPUT, --output OUTPUT Filename where inventory should be saved. -v, --verbosity Increase the verbosity levelIn case that WebDC3 must be deployed at an EIDA node, there are not many other parameters.
$ ./update-metadata.py eida -h
usage: update-metadata.py eida [-h]

optional arguments:
  -h, --help  show this help message and exit
And the case of a deployment at a single datacentre not participating in any federation of datacentres like EIDA requires more information. Namely, the details about the data centre, a contact person, etc.
$ ./update-metadata.py singlenode -h
usage: update-metadata.py singlenode [-h] [-c CONTACT] [-e EMAIL] [-n NAME]
                                     dcid

positional arguments:
  dcid                  Short ID of your data centre. Up to 5 letters, no
                        spaces.

optional arguments:
  -h, --help            show this help message and exit
  -c CONTACT, --contact CONTACT
                        Name of the responsible of WebDC3.
  -e EMAIL, --email EMAIL
                        Email address of the responsible of WebDC3.
  -n NAME, --name NAME  Official name of Datacentre.
At this stage you should have an XML file, typically called eida.xml in your data directory. Once WebDC3 has run, you will also have the cache file webinterface-cache.bin there.
It is important to check the permissions of the data directory and the files in it, as webinterface caches metadata there. For instance, in some distributions Apache is run by the
www-datauser, which belongs to a group with the same name (www-data). The data directory should have read-write permission for the user running Apache and the user who will do the regular metadata updates (see crontab configuration in the last point of this instruction list). The system will also try to create and write temporary information in this directory, but it will still work even if this cannot be done.Warning
Wrong configuration in the permissions of the data directory could diminish the performance of the system.
One possible configuration would be to install the system as a user (for instance, sysop), who will run the crontab update, with the data directory writable by the group of the user running Apache (www-data in Ubuntu/Mint).:
# cd {top directory}
# sudo chown -R sysop.www-data .
# sudo chmod -R g+w data
Visit <http://localhost/webinterface>. You should see the front page.
Arrange for regular updates of the metadata in the data directory. Something like the following lines will be needed in your crontab:
# Daily metadata update for webinterface:
52 03 * * * /var/www/webinterface/data/update-metadata.py eida
or if you run it outside EIDA:
# Daily metadata update for webinterface:
52 03 * * * /var/www/webinterface/data/update-metadata.py singlenode \
            -c CONTACT -e contact@mail.org -n "My name" MYDCID
Installation problems
If you see the basic web interface page, but none of the controls load, you may not have the underlying services running correctly. Look in your web server log files (e.g. for Apache: access_log and error_log) for clues.
If you visit http://localhost/webinterface/wsgi/loader (or similar) on your machine you should see the definitions that the JavaScript needs to get started:
var eidaJSSource='/webinterface/js';
var eidaCSSSource='/webinterface/css';
var eidaServiceRoot='/webinterface/wsgi';
var eidaDebug=false;
$(document).ready(function() { $.getScript(eidaJSSource + '/loader.js') });
If these definitions are not found, then you won’t have any controls. If they do show up, check that the URL paths look correct.
You should also be able to visit the “web service” URLs in your browser e.g. going to:
http://localhost/webinterface/wsgi/event/catalogs
should show you something like this:
{"geofon": {"description": "GFZ (eqinfo)", "hasDepth": true, "hasDate":
true, "hasRectangle": true, ...
Configuration options
Configuration follows the SeisComP3 pattern. Configuration is read from files using a ‘dotted’ notation e.g.:
js.wms.server = "http://myserver.org/wms/vmap0"
See the SeisComP documentation [http://www.seiscomp.org/] for details. Configuration variables beginning with “js” are loaded by the JavaScript loader and made available to scripts in the client’s web browser. Other variables are only available to the Python-based back end modules.
The following files are sought, and if present, their configuration information is loaded, in the order shown:
- $SC3ROOT/etc/defaults/global.cfg
- $SC3ROOT/etc/defaults/webinterface.cfg
- $SC3ROOT/etc/global.cfg
- $SC3ROOT/etc/webinterface.cfg
- $HOME/.seiscomp3/global.cfg
- $HOME/.seiscomp3/webinterface.cfg
Remember that $HOME is for the user running webinterface, which might be the same user as runs your web server. It may be helpful to make a symbolic link from one of these locations to a file in the webinterface directory e.g.:
cd /var/www/webinterface; ln -s /path/to/webinterface/wsgi/webinterface.cfg .
At a minimum, you will need to
- set arclink.address to point to your Arclink server,
- set SERVER_FOLDER to the top directory of your webinterface installation
to something suitable for your site. Other options should be suitable for getting started. You may also wish to adjust the selection of event services. For full details of all configuration options, see full-config-options.
General options
- Mail server details. WebDC3 sends e-mail to the address given in the Arclink request confirming that the request has been submitted. FIXME
- Temporary files. WebDC3 creates files in Python’s default temporary directory. This is typically /tmp. This location cannot yet be overridden in webinterface, but you may be able to change it by setting TMPDIR in WebDC3’s environment.
Metadata options
List of sensor types. This list is displayed in the Stations/Streams tool and can be configured by modifying the variable
self.senstypesin the file wsgi/inventorycache.py. The values can be also grouped but must be separated with a space. For instance, VBB BB will select the streams that are either VBB or BB, while OBS will select only the ones that match this value.Arclink server address:
arclink.address="eida.gfz-potsdam.de:18002"
The server to connect to, given as hostname:port. Change this to your local Arclink server.
Arclink nodes configuration file:
arclink.networkXML = "eida.xml"
This is an XML file [or a URL?]. This option enables you to give a list of Arclink servers which can be checked for status of requests. Generally this list should be those servers which are included in the routing table provided by your Arclink server. For an EIDA node, this should be the EIDA master table.
Events options
FIXME: See options configuration section
Event Search Control options:
js.events.magnitudes.minimum = 3.0
js.events.depth.minimum = 0
js.events.depth.maximum = 1000
js.events.coordinates.north = 90
js.events.coordinates.south = -90
js.events.coordinates.west = -180
js.events.coordinates.east = 180
Event service configuration options:
event.[list of services]
event.names.lookupIfEmpty = True
event.names.lookupIfGiven = False
Customisation
You may safely modify the following to suit your web site needs:
webinterface.cfg - this was described above. (Location: where SeisComP looks for configuration files.)
index.html template document. The template must do the following:
Make sure jquery gets loaded e.g.:
<script src="tools/jquery/jquery-1.9.1.js"></script>
<link rel="stylesheet" href="css/smoothness/jquery-ui.css" />
<link rel="stylesheet" href="css/smoothness/jquery.ui.theme.css" />
<script src="tools/jquery/jquery-ui.js"></script>
<script src="tools/jquery/jquery.cookie.js"></script>
Make sure OpenLayers gets loaded:
<script src="tools/openlayers/OpenLayers.js"></script>
Load the JavaScript loader:
<script src="loadme.js" type="text/javascript"></script>
The template should contain “<div>” elements for the JavaScript controls. They should be left empty in the template because their content will be filled by the controls running in the client’s brower. The following controls are available:
<div id="wi-Console" class="consoleframe"></div>
<div id="wi-StatusListControl" class="frame"></div>
<div id="wi-StatusQueryControl" class="frame"></div>
<div id="wi-StatusFullControl" class="statusframe"></div>
<div id="wi-EventSearchControl" class="frame"></div>
<div id="wi-StationSearchControl" class="frame"></div>
<div id="wi-SubmitControl" class="frame"></div>
<div id="wi-MappingControl" class="frame"></div>
<div id="wi-RequestManagerControl" class="frame"></div>
Do not remove the footer text, “Web Interface developed by Helmholtz-Zentrum Potsdam - Deutsches GeoForschungsZentrum GFZ for EIDA, 2013”, which should remain visible to all visitors to the page.
css/sample.css - Cascading Style Sheet file.
Maintenance
There may be some temporary files to clean up from time to time.
These should be in Python’s default temporary directory e.g. /tmp.
Metadata may need updating after changes in Arclink inventory - you
can safely run the update-metadata.py script at any time to do that.
Webinterface creates a processed version of the Arclink XML, but this
will be automatically updated each time webinterface notices a
new inventory XML file.
Upgrade
At this stage, it’s best to back up and then remove the old installation first.:
cd /var/www ; mv webinterface webinterface.old
Then reinstall from scratch, as in the installation instructions.
Your web server configuration should need no modification.
At Steps 4-6, re-use your previous versions of webdc2.wsgi and webinterface.cfg:
cp ../webinterface.old/wsgi/webdc3.wsgi wsgi/webdc3.wsgi
cp ../webinterface.old/wsgi/webinterface.cfg wsgi/webinterface.cfg